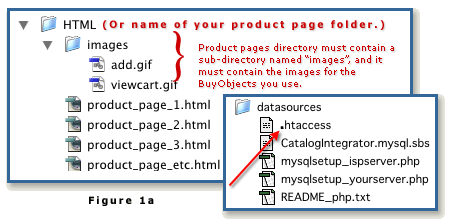
2) Make a backup copy of the entire "Catalog" folder. Also, as you work, back up any and every file before making any changes to it.
2a) Click here to read Security Extras and Things to Know While Setting Up.
3) If you do not already have a GoLive ".site" file for this site, you should create one in GoLive.
Note: The file, "index.html" is intended as a place-holder for your site home page. If you already have a home page named "index.html on the server, just replace the one in the Catalog folder with yours, so you don't accidentally overwrite it.
4) Upload the entire contents, including Documentation and SamplePages, etc., of the "Catalog" folder
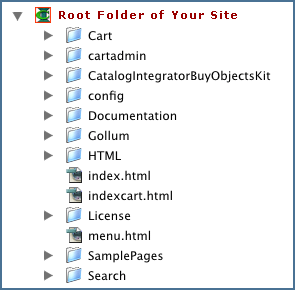
There are other options, such as using the "CIModelUnix folder" site template described in the CatalogIntegrator BuyObjects Kit Documentation. However, we strongly suggest that for your first CatalogIntegrator site, you do it this way. It will make it simpler. You can leave any existing site files and folders where they are.* Just make sure the ones you see in Figure 1, are in your site on the server.
5) Open the Cart directory and find the domains.dat file in it. Important info for Mac users. Add your server IP numbers, virtual IP number and all your domain name(s) for the web site, as shown in Fig 1a.
There are some Unix comment characters (#) at the beginning of lines in domains.dat. They are comment tags which disable those lines. Remove them only from lines you want to use, as in Figure 1a.
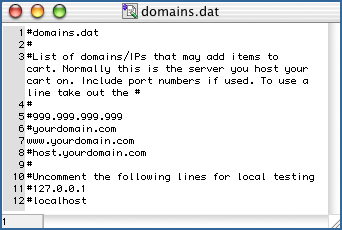
Fig 1a: domains.dat file
Entries must not have any empty space in front of them, and there can be only one entry per line.
6) You now need to insert your MySQL database access information into the "CatalogIntegrator.mysql.sbs" file which is located in both the config/datasources directories. Important info for Mac users. Below is the default setting. You will need to replace the placeholder text with actual information provide by your ISP or local server administrator.
---Placeholder Contents of CatalogIntegrator.mysql.sbs file ------
host localhost
database your_database_name_here
user your_mysql_username_here
password your_mysql_password_here
There needs to be a blank space after the first word of each line in the above example followed by the actual access information data for each value ...host, database, user, password.
Now, make a copy of this file (CatalogIntegrator.mysql.sbs) and copy it to the cart/SSL/datasources directory. Do not change the file name.
This second copy is needed to allow the cart's secure checkout pages to authenticate to the cart's MySQL databases.
Setting Correct Site Server Permissions (called "Rights" in the GoLive Inspector)
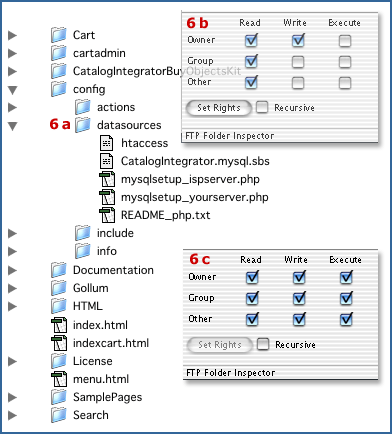
(See Figure 1b.) * It is very important that the "CatalogIntegrator.mysql.sbs" files, which resides in the datasources sub directory has full public WRITE permissions during this set up process.
You can probably do this in GoLive: So, view your site on the server with the FTP Program, and select the config/datasources directory shown in Figure 1b, 6a.
Check "Recursive, and the rest of the checkboxes as shown in 6c and click on the "Set Rights" button. That should do it. ("Recursive" should make this action apply to all the contents of the directory you have selected.)
But, to be sure the files inside the "datasources" folder all have full write permissions (Rights), open up the "datasources" folder and check each one of them to make sure they are set like what you see to the right in 6c.
Note: If you can't get this to work in the GoLive FTP Browser, ask your ISP to add Public Write Permissions to the config/datasources directory. Some ISPs offer the ability for the merchant to set directory and file permissions through a Site Admin Module which will allow you to do it yourself.
7) Next, you'll need to install your MySQL Database Tables for CatalogIntegrator.
Note: There is a security file named "htaccess" in the config/datasources file. Make sure you do not open it with GoLive Line Breaks set to "Macintosh (CR)" as that will break the file and render it useless. Use "Unix (LF)" instead. (More.)
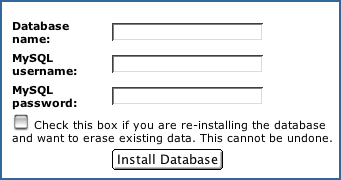
Open <http://www.YourDomain.com/config/datasources/mysqlsetup_ispserver.php> from the server in your web browser ... do NOT try to edit it in GoLive.
MySQL Database name,
MySQL username and
MySQL Password from your ISP.
Just enter them in the boxes shown in Figure 1c.
Do not check the box unless you have already installed the database and need to re-install it. It deletes the original database.
Open <http://www.YourDomain.com/config/datasources/mysqlsetup_yourserver.php> from the server in your web browser ... do NOT try to edit it in GoLive.
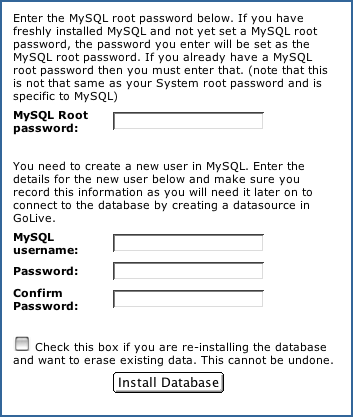
MySQL Root password.
MySQL Database name,
MySQL username and
MySQL Password.
Just enter them in the boxes shown in Figure 1d.
Do not check the box unless you have already installed the database and need to re-install it. It deletes the original database.
If you do need to re-install the MySQL Databases, then you must delete the former ones, so check this box.
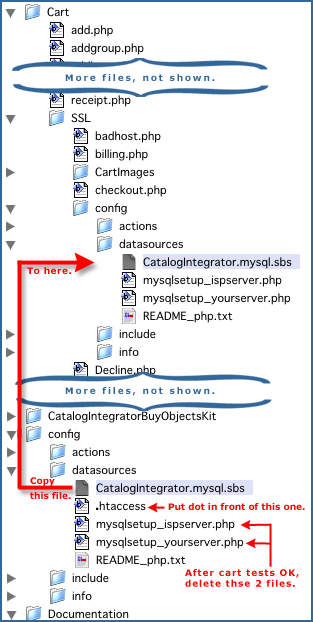
7d) After you have completed the installation of the MySQL Database Tables, make a copy of the "CatalogIntegrator.mysql.sbs" file which is also in "config/datasources", and put the copy in the secure (SSL) "cart/ssl/config/datasources" directory.
(See Figure 1e, left.)
This second copy is needed to allow the cart's secure checkout pages to authenticate the cart's MySQL databases.
At this point, the cart should be installed and running. You can now test the cart with one of the sample Product Pages, here or here.
After completing set up, the "mysqlsetup_yourserver.php" and "mysqlsetup_ispserver.php" files should removed from the non-SSL "config/datasources" directory for security reasons.
8) Configuring the cart for your ISP's SMTP (email application) service.
By default, an order completion email is sent to both the customer and to you, the merchant. You need to customize some settings to ensure that the mail is sent correctly.
To do so, open your receipt.php page and alter the hidden php code of the original receipt.php page.
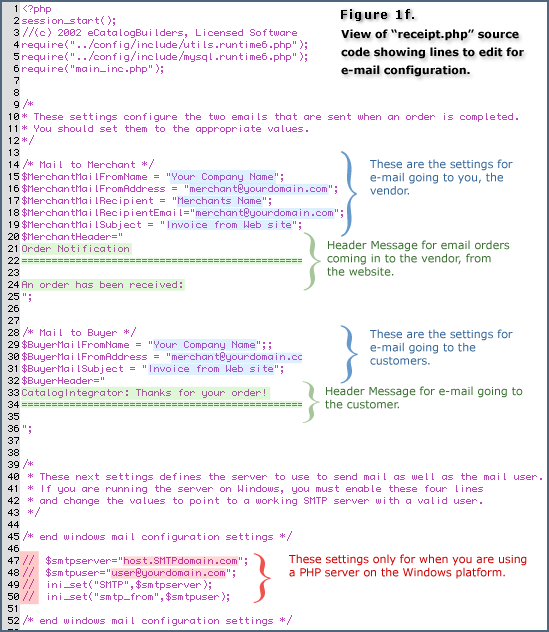
The below screen shot, Figure 1f, shows the parts of the email application code within the receipt.php page, that you need to customize. Back it up before you start.
The code to be customized is highlighted in color, with matching color coded instructions.
Settings for e-mail coming to you are highlighted in blue: these settings should be altered to reflect your details. The first block of settings are for the email going to you and the second block are for the email going to the purchaser.
Settings for e-mail headers are highlighted in green: The MerchantHeader and BuyerHeader, highlighted in green, allow you to add a custom message to the e-mails sent from the cart. This message will appear at the top of each email that is sent.
Most Unix servers use a standard mail sending application called sendmail. This application will already be configured for use with PHP and you do not need to change any other settings than the above, if you are using a Unix server.
Settings for PHP running on Windows are highlighted in red: If you are running the cart using a PHP server on the Windows platform, you will need to change the settings highlighted in red. These must be set to valid settings for your ISP's SMTP mail service. The value smtpserver should be set to the domain name or IP address of your ISP's SMTP server and the value smtpuser should be set to the email address of a user who is allowed to send mail through that server.
If you're not sure what these settings for the SMTP service should be, please contact your ISP's systems administrator.
That completes the installation and basic setup.
You should be able to run a test order now. Test it by accessing your site (on the server) via your web browser, and opening the "default.php" sample page that is provided in the site. The browser URL to the sample product page is http://YourDomainName.com/HTML/default.php
If you have any problems at this point, Click Here to Debug your Installation
The next step is Config Options.
