| Back | Printable |
Client Side Image Maps, Page 2 |
Next | |
Continued: After you have created the hot spots, and added the Javascript submit code, the next step is to add the actual Image Map BuyObject code. As mentioned earlier, you can't add code to the image by dropping it on the image, but you can add it by dropping it into the HTML Source.
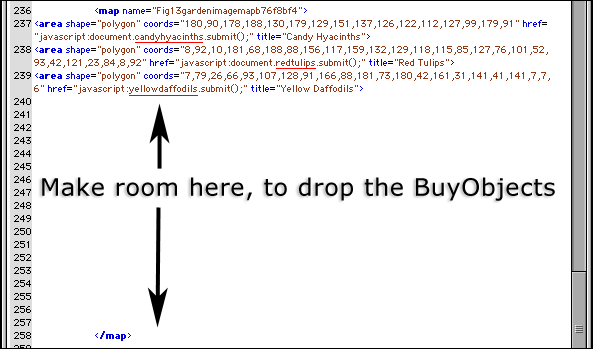
Up to now, you have been working in Layout view. Now switch to Source view and find the Image Map code. Fig. 16 is a screen shot of the code from the Image Map started on the last page. It shows the Javascript Submits made by dragging and dropping into the Inspector, and typing in the productname (underlined red for clarity in Fig. 16). You will also see the title, which is the product name that shows in the cart. This can be written as you wish. But the term "productname" is a value used by the cart to match the submits with the BuyObjects, and must be identical with the name of the form in its matching BuyObject. In other words, each BuyObject is paired with a Javascript Submit, and their names must be exactly the same. Also, don't use spaces in the productname. If you later find that everything looks right in your image map but nothing happens when you click on a product hot spot, check to make sure there is not a difference in the naming of the pair.
To continue:
B) Find the image map code and hit "return" or "enter" several times within it to create a space in which to drop the BuyObjects. All parts of the BuyObject code, including the submits, must be between the map tags.

Fig. 16: HTML Source Code of Image Map, showing Javascript Submit, before BuyObjects are added.
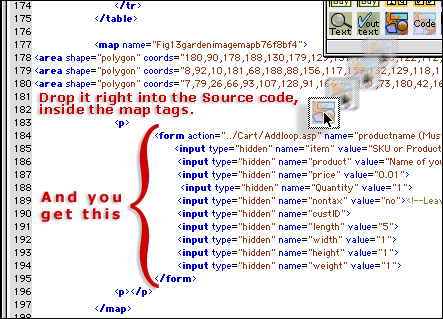
C) Drag Image Map BuyObjects ![]() into the space below the <area shape= tags with the javascript submits in them, as shown in Fig. 17. One BuyObject for each hot spot. All the <area shape= tags and all the BuyObjects must be inside the map tags.
into the space below the <area shape= tags with the javascript submits in them, as shown in Fig. 17. One BuyObject for each hot spot. All the <area shape= tags and all the BuyObjects must be inside the map tags.

Fig. 17: Dragging and dropping the Image Map BuyObject into HTML Source.
D) The BuyObjects are contained inside form tags. (<form action="etc., etc., etc."> and the closing tag </form>) Below is the code for one of the Image Map BuyObjects.
The Form (<form action="etc.) is linked by default to "../Cart/Addloop.php". (See the "add" pages for more details) and is named "candyhyacinths" which is the name of the product in this case.
Fill in the rest of the values such as item number or SKU, product, price, etc. per the instructions on the BuyObjects page. The only difference here is that you do it in the HTML source instead of in the inspector. Don't change anything else in this code except the values. The ones that need to be entered in every case are marked in red. The others are optional.
This is the model you follow. All of the Image Map BuyObjects should be set up this way.
<form action="../Cart/Addloop.php" name="candyhyacinths" method="Get">
<input type="hidden" name="item" value="CH412">
<input type="hidden" name="product" value="Candy Hyacinths Bulbs">
<input type="hidden" name="price" value="5.95">
<input type="hidden" name="Quantity" value="1">
<input type="hidden" name="nontax" value="no">
<!--Leave CustID blank.-->
<input type="hidden" name="custID">
<input type="hidden" name="length" value="5">
<input type="hidden" name="width" value="1">
<input type="hidden" name="height" value="1">
<input type="hidden" name="weight" value="1">
</form>
(Note that the form action name "candyhyacinths" (in red for emphasis) is identical with the productname "candyhyacinths" in the javascript submit script.
E) Repeat step D) for each BuyObject.
F) Do this for each separate "area shape" and "form action" pair.
G) The Image Map BuyObject form is linked to "addloop.php" by default. This requires a "View Cart" button so your customers can get to the cart. If you want to take your buyers to the cart view immediately, re-link it to "add.php", in which case the "View Cart" button is not necessary.
H) That's it. Image Map BuyObjects done.